CRAFT: Weekly Menu Planner
COST: ~ $0-10 (depending on the materials used/already have)
CRAFTING TIME: 30 minutes-1 hour (depending on your level of indecisiveness)
- Purchase or use an old frame. I wanted one that was bigger (11 x 14) so I would have enough room to write what I want. I bought a 2 pack from Michael's for $6.00 (with a 25% off coupon). There are some great picks at local thrift stores too!
- Decide on a color scheme and choose your scrapbook papers you'd like to use. If you're anything like me, this part takes forever.
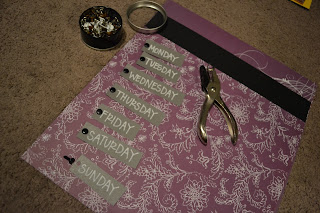
- Because I bought a photo frame (as opposed to a scrapbook frame that cost almost $15.00 more), I had to get creative on covering the 11 x 14 space with 12 x 12 paper. Thus, I choose two purple papers that I liked and a few accent colors (black and gray) to assemble together.
- Make labels with the days of the week. There are many different variations that you can do with this. I decided to keep it simple and write on cardstock with white marker. I added black brads to them to spice things up. However, you could use label tags, write directly onto the scrapbook paper, use stenciled or sticker letters. etc. The possibilities are endless!
- Next, decide on what you'd like for the title. You could use a bigger version of what you used for the labels or something completely different. Again, there are lots of possibilities :) I decided to go with foam sticker letters.
- Helpful Hint: When using sticker letters, cut them out with the backing on them and arrange them before sticking them onto your piece. This helps with keeping things nice and centered, or off center if that's what you're going for :)
- Secure all current pieces with adhesive. I live and die by photo splits (small square double-sided adhesives) and zots (clear round glue dots).
- Lastly, I added a strip of black cardstock with a piece of white shimmer ribbon. I used the glue dots for the ribbon since they are clear and small. It was perfect for covering the overlap of the two different purple designs and added a nice separation between title and "content."
- Finally, place your scrapbook paper in your old frame! Use a dry erase marker to write in meals, grocery items, etc.
This idea is great not only for menu planners, but for calendars, to-do lists, abc practice for kids, photo message boards and anything else you can think of :)


it turned out really cute!!!!
ReplyDelete